Pages

Showing posts with label cleanup:draw. Show all posts

Wednesday, August 12, 2015

New Place, First Meal

Yes, we've moved since I last posted here. And last night, I got the kitchen unpacked, so tonight, I cooked dinner!


I've recently started using Ibotta and Cartwheel to save some money. (I mean very recently... so far I've saved a little over $5 with Cartwheel and before the receipt for this meal I had $2.50 on Ibotta.)

So today when I went grocery shopping on my lunch break, I tried to buy exclusively things that were on one app or both. Out of the whole receipt, the only things not on either app were potatoes, which I thought I would use in tonight's dinner but decided to go with pasta instead.

Which means this meal was made exclusively from items purchased cheaper or with rebates using those two apps. And I totally winged the whole meal. And it was pretty delicious.

To ease myself back into the food blogging thing, I'm not going to do formatted recipes, just a narrative of what I did.

Boneless Pork Chops, Onions, and Italian-Parmesan Pasta
First, I started the water boiling for the pasta, to give myself some time to figure out what else I wanted to do. Once it started boiling, I put in the pasta and cooked it about 7 minutes (I didn't use much). While that was boiling, I put Italian breadcrumbs, Parmesan cheese, garlic powder, and shallot-pepper seasoning in a bowl and mixed it up, and whisked an egg in another bowl. I also chopped up about half an onion. Once the pasta was done, I drained it in a colander and rinsed it with cold water. Then I put a skillet on the hot burner and melted about 1 Tbsp butter in it. I dredged the boneless center cut pork chops in the egg, then the breadcrumb mixture, coating them evenly, and put them in the skillet. I didn't time them, but a few minutes on each side? Part of the time it was covered, and part of the time it wasn't. Like I said, I winged it all. Once I cut into one and they were done, I moved them to a plate and put the pan lid over them to keep them warm. Then I put another 1/2 Tbsp or so of butter in the pan and put in the onions and maybe 1 tsp of minced garlic. I stirred them up to get the bits up from the pork in the pan mixed in with the onions, and I salted them a little. While they cooked, I put some zesty Italian dressing in the pasta and mixed it thoroughly, then did the same with some Parmesan.

Sunday, January 25, 2015

Pasta and Cheese

I think it's unfair to call mac and cheese "mac and cheese." I don't think I've eaten an actual macaroni noodle since my freshman year of college (because Easy Mac is so quintessentially dorm food). The best "mac and cheese" is made from fancier noodles (my personal favorite is cavatappi, but rotini is a close second). Anyway, this is pasta and cheese, the recipe for which I took from here. (Basically, I cut it in half and added bacon.)


Pasta and Cheese

Ingredients
1/2 lb pasta (I used rotini)
1/4 cup butter
1/4 cup flour
2 cups milk
3 cups shredded cheese (I used white Cheddar)
salt and pepper
another 1 T butter
1/4 cup panko crumbs
few Tbsp Parmesan
garlic powder
bacon

Equipment
saucepan, pot, pan, stove (and three burners that function at the same time), colander, 9"x13" pan, oven

Instructions
Preheat the oven to 350F. Cook pasta according to package instructions. Start cooking some bacon*. While that's happening, melt the 1/4 cup of butter in the saucepan, sprinkle in the flour and whisk it together. Let it cook for 2 minutes. In the meantime, start the 1 Tbsp butter melting in a pan. Once melted, add the panko crumbs, Parmesan, and a little garlic powder. Stir often until they get golden brown and toasted. Gradually add the milk, whisking as you go until it's smooth. Add the cheese a small handful at a time, letting each one melt before adding the next. Salt and pepper to taste. Drain the pasta and add it to the cheese mixture. Chop up your bacon and stir it in. Pour the whole thing into a greased 9"x 13" pan. Top with the toasted panko. Bake for 12-15 minutes.

*If you cook your bacon on the stove or in an oven, I would strongly recommend making the bacon beforehand. I was raised making bacon in the microwave so that's how I did it. If you try frying the bacon on the stove while you do everything else, you'll have four burners going at once and one of them will be spitting bacon grease at you. If you make it in the oven, you could throw off your oven preheating for baking the pasta at the end.

Yields
3-4 servings

Total time
About 30 minutes

Cleanup rating 6/10
What a pain. Pan, pot, another pan, plus a baking dish. Two of them with cheese all over the place.

Flavor rating 8/10
YUM. Delicious. I haven't eaten homemade pasta and cheese in a very long time. It's a bit of an ordeal to make compared to a lot of the stuff I post here, but totally worth it.

Difficulty rating 6/10
The difficult part of this recipe is doing many things at once. Boiling water for pasta and preheating an oven are easy enough, but you also have to make sure you don't burn flour, milk, cheese, or panko crumbs, while the pasta doesn't boil over. It's quite a bit to keep track of compared to what I normally do for dinner.

Adjustability: high
You can put just about anything you want in your pasta and cheese. I wanted bacon, so I used bacon. I considered broccoli but instead made peas to go with it. You could put other meats or vegetables or whatever in it. You could use any cheese you want. I had some Monterey Jack in the fridge too, and if I had more of it, I would have used Gouda. And, of course, use whatever pasta you want. I like rotini because it holds the cheese in the little grooves.

Make it with...
See the adjustability section, I guess. It's pasta and cheese... it goes with just about everything.

Thursday, January 8, 2015

Chicken Lazone

I had never heard of chicken lazone before, but I ran across a recipe here and thought it sounded too easy and delicious not to try. It was good, but I think I need to make it again and let the sauce thicken a little longer and it would be perfect.


Chicken Lazone

Ingredients
2 thin boneless, skinless chicken breasts (either cut in half lengthwise or pounded flat)
garlic powder
onion powder
chili powder (I didn't have this, so I used taco seasoning... close enough!)
1 cup heavy cream
2 T and 2 T butter

Equipment
skillet, stove

Instructions
Season your chicken breasts on both sides with the three spices. Melt 2 T of butter in the pan and cook the chicken on both sides until done. Melt the remaining 2 T of butter around the chicken and pour in the cream. (If necessary, scrape up any seasoning that has stuck to your pan and incorporate it.) Cook for about 8 minutes until sauce thickens.

Yields
2 servings (two chicken breasts)

Total time
about 20 minutes

Cleanup rating 4/10
This rating was arrived at because I was a responsible adult and cleaned the pan immediately after eating dinner. Don't let this one sit. My sauce was thin enough that the little bit left in the pan just went down the sink drain, and it's only one pan so it's not too bad.

Flavor rating 6/10
Birk liked it more than I did, but it did grow on me the more I ate. Like I said at the top, I think I should have let the sauce thicken more.

Difficulty rating 5/10
It doesn't take a very long time, it's almost the same as my basic chicken recipe but with a sauce component added to the end, and the skills necessary are pretty simple (recognizing when chicken is done and when sauce is thickened).

Adjustability: medium
You can switch up the spices and maybe add vegetables or cheese or something. It's hard to say with this one.

Make it with...
I made this with garlic mashed potatoes (the sauce was delicious on them) and a recipe I'm about to post, kale and onion saute. Everything went really well together. The original recipe showed the chicken and sauce being served over a long noodle like spaghetti, which would probably be really good too.

Cost
Chicken, heavy cream, butter, and the spices all belong in my kitchenventory, so the garlic mashed potatoes (about $2) were the only thing I bought that I don't normally have on hand.


Tuesday, December 2, 2014

Chicken and Onions

I didn't take a picture of this dinner, but I've made it several times before. In fact, I was surprised to find that I hadn't posted it here before.

Chicken and Onions

Ingredients
two boneless, skinless chicken breasts
one large onion, sliced
olive oil
salt, pepper, paprika, garlic powder

Equipment
oven

Instructions
Preheat the oven to 450F. Line a baking dish with foil (this recipe can stick to a pan and hold on for dear life). Put the chicken and the sliced onions in the dish and drizzle with olive oil. Toss to coat. Sprinkle with seasonings of your choice (I like garlic on everything, and paprika gives it a nice color). Bake for about 30 minutes.

Yields
2 servings

Total time
30 minutes

Cleanup rating 3/5 if you use foil
If you don't use foil, have fun scrubbing onion bits off your dish. Been there; done that. Now I only make this dish with foil.

Flavor rating 7/10
Sometimes I overcook this. Sometimes I undercook it. When I get it right, it's a 7/10. When I don't, it's like a 3.

Difficulty rating 2/10
So simple. Surprising, considering I just admitted to screwing it up sometimes.

Adjustability: medium
You can add other veggies, or use different seasonings, but that's about all there is to it.

Make it with...
This time I made it with rice in the rice cooker that I added shredded gouda to (try it, it's great). You can make it with mashed potatoes, or noodles, or any veggie side dish... it's really versatile, because it really just boils down to being chicken, seasoned however you want.

Kitchenventory
Cabinet: nothing
Fridge: chicken breasts
Countertop: onion, olive oil
Spice rack: seasonings
Miscellaneous: foil

Monday, July 21, 2014

Churro Bites

I made these as a quick-and-easy dessert to take to dinner with friends, since I was also busy making olive bread as a surprise for them.


Churro Bites
inspired by this post

Ingredients
box of angel food cake mix (or if you have a good recipe, make one from scratch)
several Tbsp cinnamon (throw in some Vietnamese cinnamon if you want it strong!)
several Tbsp sugar

Equipment
oven and cake pan (if you need to make your cake), cutting board, knife, bowl

Instructions
Make your angel food cake according to package instructions. Allow it to cool completely. Mix sugar and cinnamon in a bowl. Cut the cake into bite-sized cubes. Roll each cube thoroughly in the sugar and cinnamon (tap them to shake off the excess).

Yields
a whole cake's worth

Total time
about an hour; check the instructions on your cake box; mine took 30 minutes, and I let it cool for about 30 minutes outside of the pan

Cleanup rating 3/5
You'll get cinnamon and sugar everywhere, but that's relatively easy to clean up. Other than that, you only have a few things to clean (bowl, pan, knife, cutting board). My hands always get a thin stickiness on them from working with angel food cake, though. Wash everything thoroughly! (Like you should anyway.)

Difficulty rating 3/10
Any idiot can bake an angel food cake. (You literally preheat the oven, mix the box of powder with the prescribed amount of water, pour it into a pan, and put it in the oven.) Letting it cool is a matter of not doing things, and cutting it up is less difficult than I expected (I had a fantastically sharp knife, though). Just don't try to rub your eyes while your fingers are coated in cinnamon. Not a good idea.

Flavor rating 7/10
Angel food is my favorite cake (it's like a giant, fluffy, marshmallow... but cake!) and I love cinnamon sugar, so this is pretty awesome. The original recipe called for frying the cake cubes in oil, which would have given them that awesome crispy churro texture, but I had neither the time nor the inclination to fry them. Some of the feedback I got (all positive) was that they're strong, and you so often get cinnamon-flavored desserts that barely taste like cinnamon at all. (I shared the secret: Vietnamese cinnamon.)

Adjustability: low
I don't know what else to do to these things. You could fry them like in the original post, or make an icing to drizzle on top or dip in, but that's about all I can think of. If you use a different type of cake, it would probably get too crumbly.

Make it with...
Everything. I originally decided to make them when we were going to have fish tacos for dinner, but it worked equally well with sausage-tomato-cream sauce and rigatoni. It would work with just about anything, I think. Or as a stand-alone dessert.


Tuesday, June 17, 2014

Rocky Road Cookies

These were so good. So sweet, but so good. Kind of like the GoT finale I made them for.


Rocky Road Cookies

Ingredients
3 cups powdered sugar
2/3 cup cocoa powder (unsweetened)
1/4 tsp salt
3 large egg whites
1 Tbsp vanilla extract
2 cups semisweet chocolate chips
2.5 oz sliced almonds (I used slivered because that's what I had)
1 cup mini marshmallows

Equipment
large bowl, baking sheet, parchment paper, oven, MUSCLES, freezer

Instructions
Preheat oven to 350F. In a large bowl, mix up your powdered sugar and cocoa. Whisk in the salt. Add the egg whites and vanilla; stir until combined. Stir in chocolate chips and almonds. (This is where the muscle comes in... it's a thick batter.) Spoon small mounds onto parchment paper and top with a few marshmallows (press them in a little to make sure they don't tumble off). Stick them in the freezer for a few minutes to prevent too much spreading when they bake. Put on a baking sheet (I didn't think it was a good idea to freeze the baking sheet itself) and bake about 12 minutes (until marshmallows are toasted like in the photo). Let them cool a few minutes on the pan before transferring to wire rack.

Yields
2 dozen cookies

Total time
about 30 minutes (I baked two batches, so about 10 minutes prep, and about 10 minutes for each batch to bake)

Cleanup rating 3/5
Chocolate everywhere. Powdered sugar more everywhere.

Difficulty rating 6/10
I'm not kidding about stirring that batter... it's thick. Don't be lazy about it, though; you want evenly distributed bits. And someone save you if you think whisking your wet ingredients in is a good idea. Your whisk will pick up all of the batter and be rendered useless.

Flavor rating 8/10
Really sweet but really yummy. Kind of sticky.

Adjustability: medium
Don't like almonds? Use pecans, or walnuts, or no nuts at all. Try mixing some marshmallows into the batter. Try cinnamon chips or butterscotch chips or caramel bits or toffee chips. I know rocky road has a specific definition but I've always thought of it as the "everything bagel" of desserts.

Make it with...
Nothing; it's a cookie. Our dinner was burgers and hot dogs on the grill with veggies. This seemed like an appropriately casual dessert for the occasion.

Wednesday, June 11, 2014

Dipping Sauce for Dumplings

This is the incredibly easy sauce I made to go with our chicken dumplings. It almost doesn't even call for a separate post. But here it is!


Dumpling Dipping Sauce

Ingredients
2 Tbsp honey
1.5 Tbsp hoisin sauce
1.5 Tbsp orange marmalade

Equipment
bowl, spoon

Instructions
Mix the ingredients together in a bowl. (Told you it was easy.)

Yields
Um... about 5 Tbsp of sauce. Based on math.

Total time
5 minutes

Cleanup rating 3/5
It's sticky and you don't want to let it sit overnight or it will be harder to clean.

Difficulty rating 1/10
You saw the instructions, right?

Flavor rating 8/10
YUM. I like sweet sauces, so I love it. Maybe a little less honey is called for. It was delicious though.

Adjustability: low
I'm sure you can mess with this one, but I don't know what I would do with it.

Make it with...
Well, the dumplings, of course. It would make a nice dipping sauce for most Chinese-style foods, really. Or just plain stuff, like grilled chicken or steamed veggies.

Bonus photos:


Wednesday, April 23, 2014

Butter Chicken

Last night, I made two Indian dishes for dinner. It was a bit of an undertaking for a mid-week dinner, but hey, there are sufficient leftovers for a complete second meal!

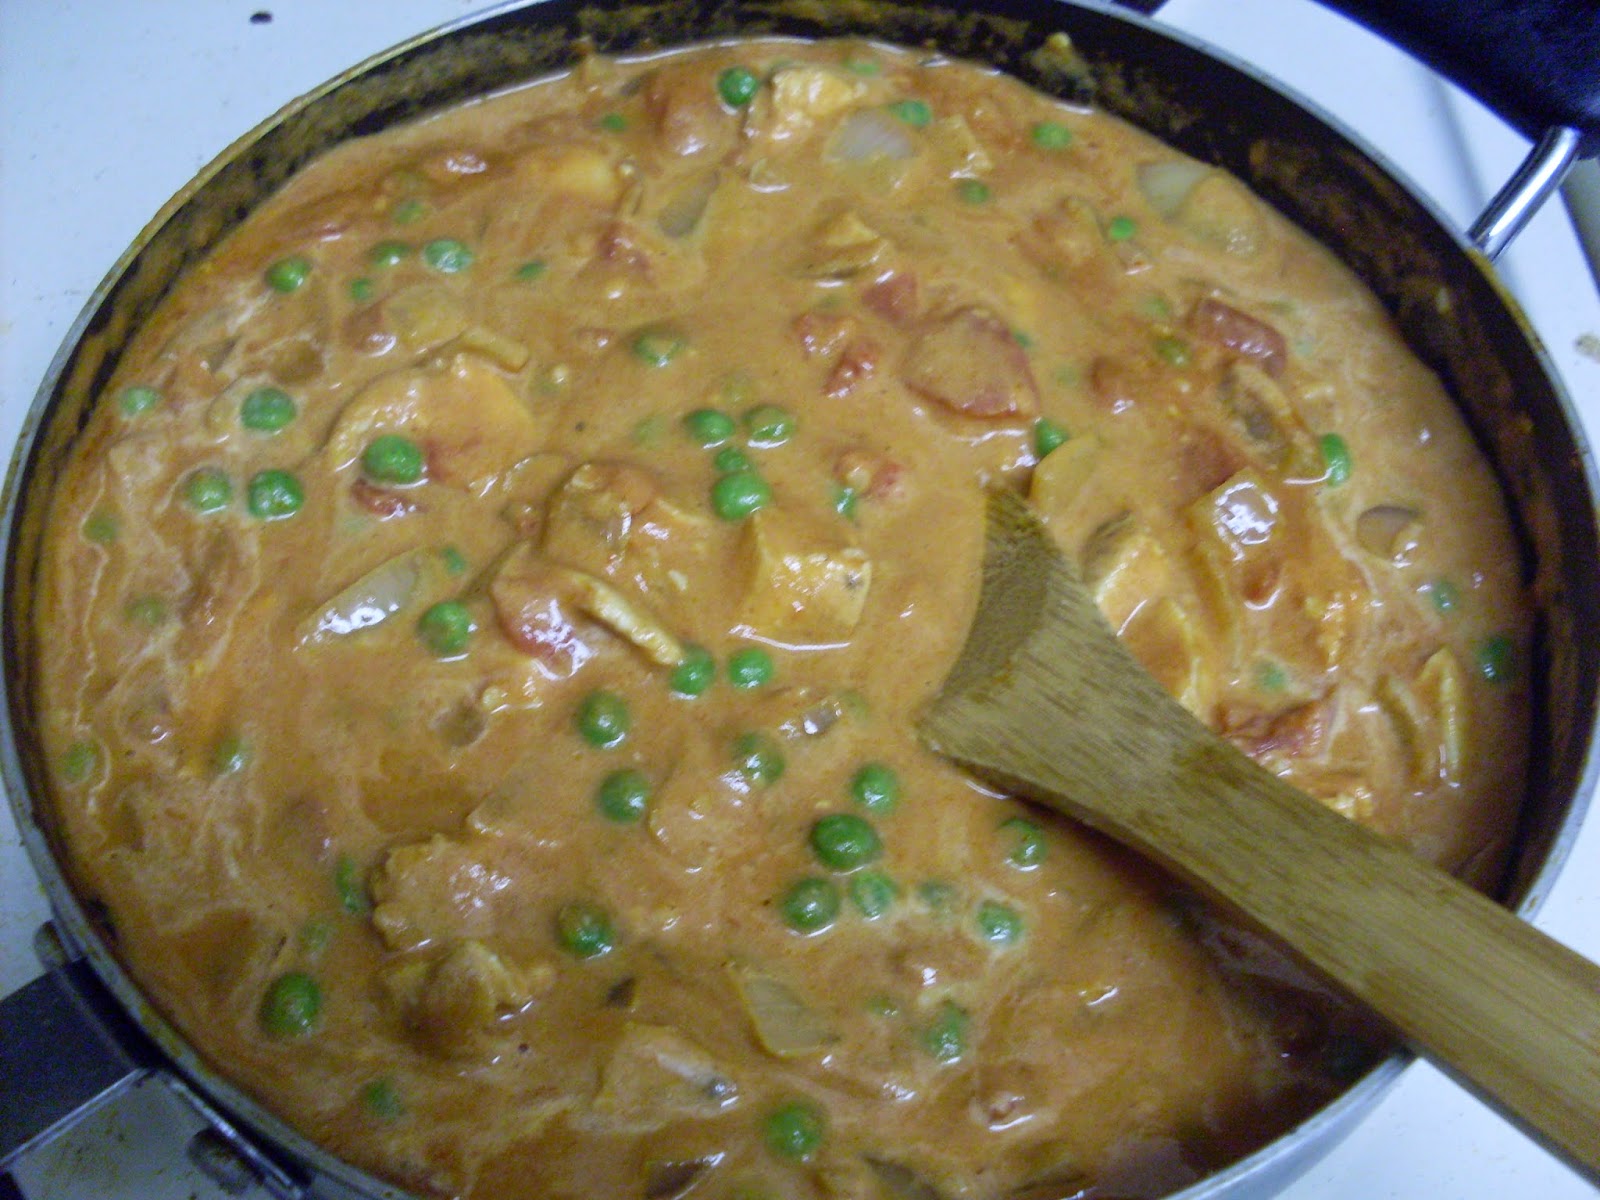
The main dish was butter chicken (which has so much more tomato in it than anything else, I think it should be called tomato chicken). I found a recipe online and made my own adjustments to it, so I know this is like... Alex-ized butter chicken. Go with it.


Butter Chicken (which I think should be called tomato chicken)

Ingredients
3 chicken breast filets
garam masala
coriander
ground ginger
cinnamon
2 tsp minced garlic
8 oz peas (I got a steam-in bag and nuked them)
3 Tbsp butter
15 oz can of diced tomatoes in juice
14.25 oz can of tomato sauce
1 Tbsp tomato paste
1/3 cup heavy whipping cream
1/2 an onion, diced

Equipment
skillet, stove

Instructions
Cook your chicken. Technically this should be made with baked or rotisserie or tandoori chicken, but I made mine like this but with garam masala and some salt. Take out your chicken and let it cool and absorb its juices for a while. (This is time I spent paying attention to the samosa filling.) Dice your onion. Melt butter in the pan and add onion, cooking until they're golden. Add the garlic, tomato paste, and about 1/2 tsp each of garam masala, coriander, ginger, and cinnamon. Stir constantly for a few minutes, until well blended. Add the diced tomatoes and tomato sauce, mix thoroughly, let it heat through. Add the chicken and let it heat through. Add the peas and cream, mix thoroughly, let it heat through but don't boil.

Yields
SO MUCH. Probably about six servings.

Total time
30 minutes if you're making it by itself*

Cleanup rating 3/5
It can be a messy dish, but it's mostly tomato sauce so it comes off fairly easily when you clean it right after dinner.

Difficulty rating 4/10
There are a lot of ingredients to keep track of, but if you play the cooking show game (set out all your ingredients ahead of time) it's a lot easier.

Flavor rating 7/10
I had never had butter chicken before, so I don't know how accurate I was, but I thought it was good. I think we could do without the diced tomatoes (I like tomato sauces but not pieces of tomato) so I'll probably experiment with this one in the future.

*I made this with samosa filling so it actually took about an hour to make dinner.

Monday, March 31, 2014

Winey Chicken and Roasted Carrots

It's a two-fer! (There's also garlic mashed potatoes and peas but there isn't much to say about them... follow box directions for the potatoes, and microwave the peas with some butter. Ta-da...)


Winey Chicken

Ingredients
Chicken (I used tenderloins, about 10 of them... 1 package)
Red wine, about a cup
Minced garlic
Olive oil, 1 Tbsp
Paprika
Brown sugar (about 1/2 cup)
Salt

Equipment
Skillet (with a lid), stove

Instructions
Put the oil in your skillet and put it on medium heat. Add garlic and let it cook until it's tender and starting to turn golden. Add the chicken in one layer and cook it ten minutes on each side (until it's almost entirely cooked; no pink on the outside). Sprinkle the brown sugar and paprika on the chicken, and pour in the wine. Cover and simmer for 15-20 minutes. (If you want even color, turn the chicken about halfway through. You can see in the photo that I didn't do this.)

Yields
About 3 servings, for us. Scalable to a degree.

Total time
About 45 minutes.

Cleanup rating 3/5
You get a gunky pan but if you wash it quickly, it's not a problem. (I didn't wash it quickly.)

Difficulty rating 5/10
You really have to pay attention to this one at all the stages, and it takes a long while. It's helpful to have a few other things going (like I did) but then you have to orchestrate everything.

Flavor rating 5/10
Good... not great. I feel like I can fix it somehow. Maybe more sugar and paprika? Maybe I needed to flip the chicken? I'm not sure. But it was good.

Roasted Carrots

Ingredients
Baby carrots
Vegetable oil
Seasonings, including kosher salt (I used shallot-pepper seasoning)

Equipment
pan, oven, foil

Instructions
Preheat the oven to 400F and line the pan with foil. Toss your carrots in the oil, coating them evenly. Lay them in a single layer on your foil-lined pan and sprinkle with kosher salt and the seasoning of your choice. Bake for 40 minutes.

Yields
How many carrots did you use? Scalable.

Total time
45 minutes

Cleanup rating 1/5
Wait for foil to cool; throw away foil. Easy-peasy!

Difficulty rating 2/10
Other than testing to make sure the carrots are done, there isn't much to this. You can do it.

Flavor rating 7/10
I love roasted veggies, especially potatoes and carrots. YUM. Just... just yum.

Tuesday, February 4, 2014

Lemon Cookies

You know those Pinterest fail blogs? Where people post their attempts at making some Martha-Stewart-looking creation they found on Pinterest and it's this horrible disaster? I thought I had one of those on my hands on Sunday when I was making cookies to take to Audrey's Super Bowl party... but they actually turned out really good. Just not the way they were supposed to. Which is fine.

This is one of those recipes that some people will scoff at, because it involves a pre-packaged cake mix. If you're that kind of person, just move on to the next post; this one will clearly not be for you.

And I forgot to take a photo of the finished product. Which just means I'll have to make them again sometime, darn...

Prebaking... the closest I have to a finished photo, sorry.
Lemon Cookies

Ingredients
1 box of lemon cake mix (I believe mine was Lemon Supreme)
2 eggs
2 cups Cool Whip (one 8-oz tub), thawed (mine was in the fridge for a few days, not the freezer)
about 1/2 cup of powdered sugar

Equipment
baking sheet, foil, mixing bowl, oven

Instructions
Preheat the oven to 350F. Stir together your cake mix, one of the eggs, and the Cool Whip in a large bowl. Mine turned out really cake-y so I added the second egg. (The original recipe I found only used one egg.) The original recipe also said to roll tablespoonfuls of the batter in powdered sugar. Well, that wasn't happening. See below. It was a total mess. So I finally gave up and instead I put spoonfuls of batter on the greased cookie sheet and sprinkled them with powdered sugar. Bake at 350F for about 10 minutes, until the edges are golden-brown. Let them cool on the sheet for a minute or two, then carefully transfer them to a cooling rack for a few minutes. They will firm up, I promise.

Yields
I made about two dozen cookies, but I also used heaping spoonfuls. You could make more if you made them smaller.

Total time
15 minutes if you don't bother "rolling" and use my method instead: 5 minutes to make the batter, 10 minutes to bake.

Cleanup rating 3/5
There will be powdered sugar everywhere if you try the rolling method. It'll also fall through the grid of your cooling racks, so be ready to wipe up the counter. The original recipe said to use parchment paper but I find that stuff annoying so I used foil, which released the cookies pretty well and kept my baking sheet clean.

Difficulty rating 5/10
You have to actually have some knowledge about baking to judge whether you need that second egg. Stirring the batter was pretty difficult, so you have to put some muscle into it to get it where it needs to be.

Flavor rating 10/10
They're very lemony, so it's not like a "lemon" cookie that is really a sugar cookie with a hint of lemon. These are LEMON cookies. And they made me pretty popular at a party where I didn't know anyone other than the hostess, so that's a good sign, I bet.

Pictured below: The mess of trying to "roll" the batter in powdered sugar.


If you try this and have more success rolling it, send me photos! Especially of the outcome... I'd love to see them turn out "right"!